
- Start from the Rider app home screen.
- Add your destination and review the ride option before booking.
- Use the confirmed trip screen to check the details of your ride.
Booking should make sense before you need it
If you are using a ride-hailing app for the first time, the easiest way to feel comfortable is to know what the main screens look like before you are standing outside waiting for a car. The WomenFirst Rider app keeps the journey in a simple flow: start from the map, tell the app where you want to go, review the ride that is available, then keep the confirmed trip details in one place.
The screens below are real WomenFirst Rider app screens. The exact labels, prices and options shown to you can vary by city, trip and app version, but the overall flow is designed to stay familiar.
Open the Rider app and start from your current location
The home screen opens on the map and gives you a clear starting point: “Where do you want to go?” From here, choose your destination rather than trying to work through a long menu.
Before you continue, check that the pickup point shown on the map makes sense for where you are actually standing. If you are at a large building, shopping centre or venue, a clear pickup location can make the meeting point easier for both you and the driver.

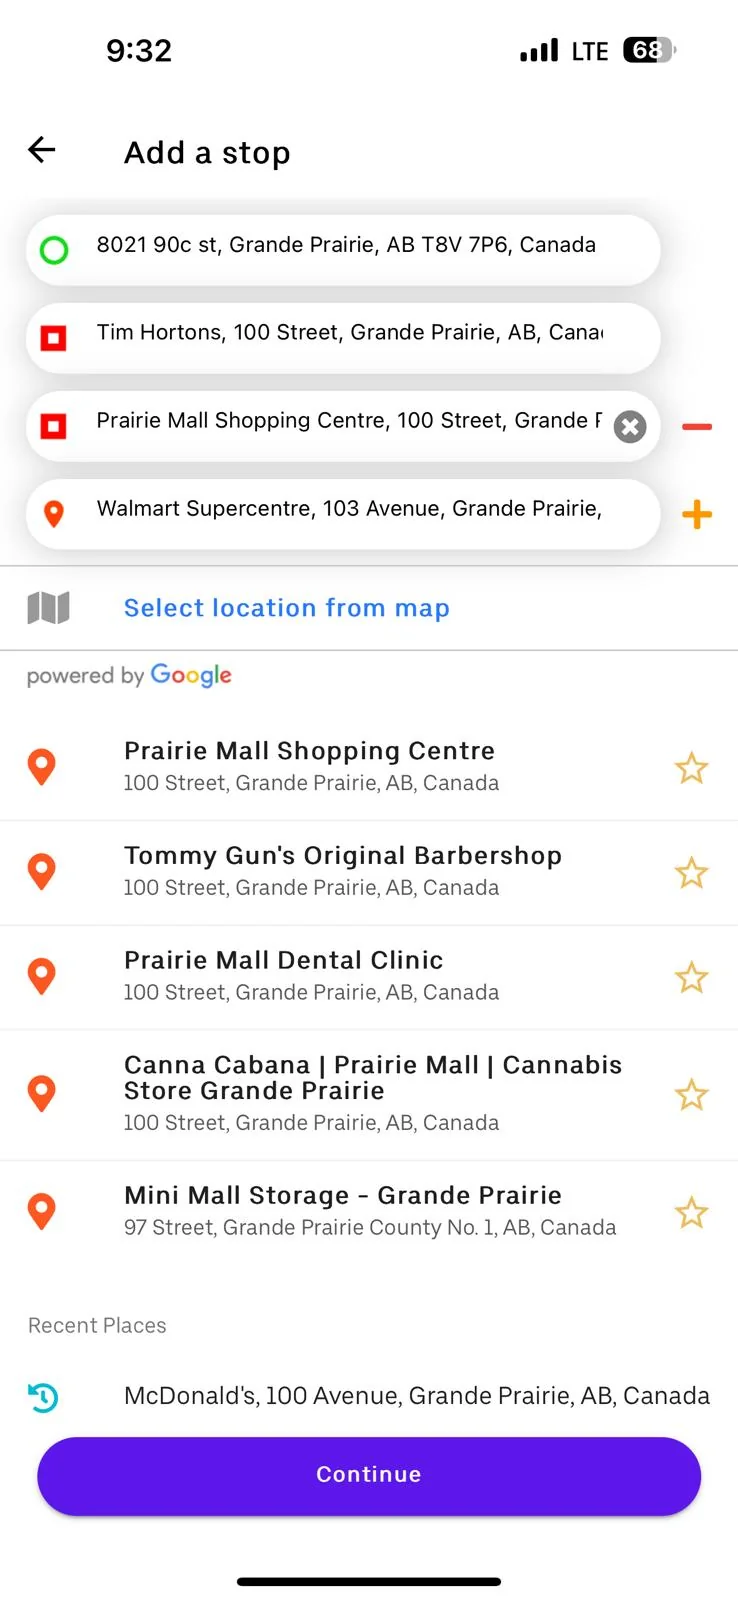
Add the destination — and stops when you need them
Enter the place you are travelling to and check the address before moving on. If your trip includes another stop, the app can show the locations together so you can review the order before continuing.
This is especially useful for everyday family trips — for example, a pickup followed by a school, appointment or shopping stop — because you can see the route information before the ride is confirmed.
Review the ride option before you book
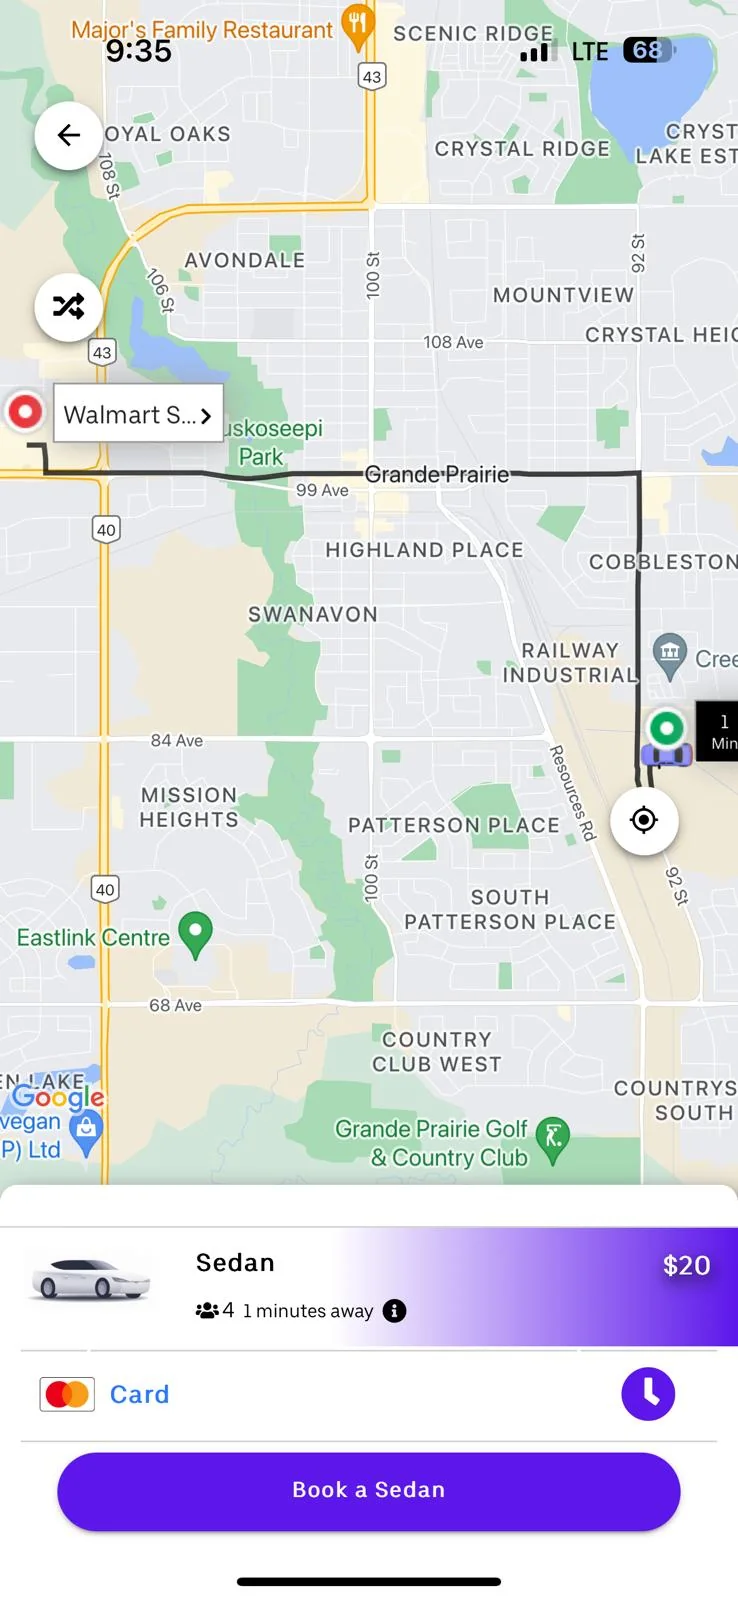
Once the trip is entered, the Rider app shows the ride option available for that booking. Review the information on screen instead of tapping through automatically. The important part is that the pickup, destination, ride type, payment method and any price shown match what you intended.
When everything looks right, use the booking button to continue. The example screen shown here is from the WomenFirst Rider app; the fare and availability you see in your own app depend on the actual trip and market.
Keep the confirmed trip details easy to find
After a ride is confirmed, the trip screen gives you one place to review key information such as the driver details, pickup and drop-off locations, trip timing, vehicle type, fare and payment method shown for that booking.
That matters because you should not have to remember everything from the previous screen. If you want to double-check where the ride is going or what was booked, return to the trip details rather than relying on memory.

What if something does not look right?
Do not feel pressured to continue through a booking if the destination, ride details or payment information is not what you expected. Go back and correct the trip where possible. If you need help with a booking or journey, WomenFirst also keeps human support behind the app.
The goal of the app is not to make riders learn a complicated system. It is to make the important choices visible at the moment you need them.
Common questions
Can I see the ride details again after booking?
Yes. The confirmed trip screen is designed to keep the main booking details together so you can review them again.
Can I add more than one location?
The Rider app includes an Add a stop flow. The exact options available can depend on the trip and app version.
Where can I get the Rider app?
WomenFirst links to the Rider app from its Book a Ride and Ride with WomenFirst pages, including the App Store and Google Play listings.
Plan booking a WomenFirst ride around the real journey
How to book a ride with the WomenFirst Rider app is most useful when the plan reflects the actual people, timing and destination involved. Start with your account, pickup pin and destination. Confirm the ride details shown before submission before anyone is ready to leave, then share the important details with the rider or driver in plain language. This preparation is not about making a simple trip complicated. It is about removing avoidable uncertainty while there is still time to adjust. For this topic, the practical goal is sending an accurate request with confidence. Keep the plan realistic for the day, including weather, mobility needs, luggage, children, work commitments or other details that could change how the journey should run.
Check the details that matter for booking a WomenFirst ride
Before committing to the next step, review location notes, fare information and booking status. Look for information that is current and specific rather than relying on assumptions from a previous trip. If something is unclear, pause and confirm it through the app or with WomenFirst support. A good check should also cover notifications and how to request support. Those details help everyone understand what will happen, who is responsible for each decision and when a change needs attention. In the context of How to book a ride with the WomenFirst Rider app, this creates a calmer experience because expectations are visible early. Save any useful confirmation, keep contact details available and allow enough time to respond if the original arrangement needs to change.
Use booking a WomenFirst ride step by step
When the journey begins, work through the plan in a calm order instead of trying to solve every detail at once. Start with your account, pickup pin and destination, then verify the ride details shown before submission. Keep the next decision visible and explain any change in direct language so the people involved know what is happening. During How to book a ride with the WomenFirst Rider app, compare the live situation with the information reviewed earlier. A small change in timing, access or communication can affect the rest of the trip, so update the plan before it becomes a larger problem. The standard to aim for is sending an accurate request with confidence. If the available information no longer supports that outcome, use the appropriate support channel and agree on a safe, practical next step.
Build safety and support into booking a WomenFirst ride
Safety is strongest when it is part of the ordinary process rather than a last-minute reaction. For How to book a ride with the WomenFirst Rider app, make the ride details shown before submission easy to find and understand. Confirm who should be contacted, what information they genuinely need and what can remain private. Also account for notifications and how to request support, because a reliable plan includes the details that affect comfort, access and timing as well as the route itself. If the rider, driver or coordinator feels uncertain, stop and check rather than filling the gap with an assumption. WomenFirst support can help clarify a booking or journey, but immediate danger should always be handled through the appropriate local emergency service. Clear boundaries make support faster and help protect everyone involved.
Avoid common gaps in booking a WomenFirst ride
Problems often begin when a familiar trip is treated as if nothing could have changed. Do not skip location notes, fare information and booking status simply because a similar journey worked before. Check current information, allow for realistic delays and make sure the pickup or handoff can be understood by someone who was not part of the original conversation. Another common gap is collecting details without deciding what action they support. Focus on which booking detail helped the driver find you and remove anything that does not help a real decision. If the plan changes, communicate the change once, clearly, through the agreed channel. The practical next move is reviewing the pickup pin once before confirming. That is more useful than adding extra instructions that nobody can reliably follow during the journey.
Turn booking a WomenFirst ride into a repeatable routine
After the journey, note what made How to book a ride with the WomenFirst Rider app work well and what you would change next time. Useful observations include which booking detail helped the driver find you. Keep only the details that make a future decision easier; personal or sensitive information should not be stored unnecessarily. For recurring travel, build a short checklist with the pickup window, essential contact method and the one or two requirements that cannot be missed. The best next action is reviewing the pickup pin once before confirming. That gives riders, families, drivers or coordinators a clear starting point without pretending every trip is identical. Review the routine whenever circumstances change so the guidance remains relevant, respectful and practical for the people using it.
WomenFirst Rider
Ready to book?
Open the WomenFirst Rider app to start your trip, or visit the Ride page first if you want to see the experience before booking.